Gingerbread Girl Pattern

hearts-border2

Valentine’s Day will be here in about ten days!

Do you need a small gift for a sweet person in your world? Maybe one of the kids has an extra-special teacher, or you have a wonderful neighbor who gathers your mail when you’re away on vacation?

How about making this little lady and attaching her to a small box of chocolates for a Valentine’s Day surprise?

trinaballerina2

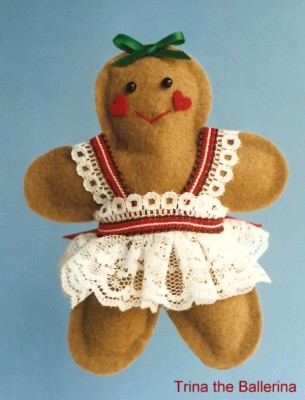
She’s a gingerbread girl who loves to dance! 🙂

This project is quick and easy! It’s made of felt and scraps of trims/lace/ribbon that you probably have around the house already, if you are a sewer. But if you’re someone who hates to sew – no problem – the directions cover “gluing” the doll, instead! Trina makes a perfect tree ornament too. Maybe you’ll decide to make a few extras for next Christmas!

Gingerbread Girl
©2009 BHEA

Please Note:
This is a decoration only and is not suitable for small children!

Supplies Needed:

9″ by 6″ piece of brown felt
2″ by 2″ piece of red felt
2 small black beads
12″ red embroidery floss
10″ ribbon – 1/8″ wide
10″ ribbon – 1/4″ wide
20″ flat lace – 1-1/4″ wide
15″ decorative trim or braid
small amount of polyfil stuffing
12″ thin gold cord for a hanging loop

For full-size pattern pieces and complete instructions, click the following link:

gingerbread-girl-pattern

Have fun experimenting! Dress “Trina” in a different style if you wish. Add a little hat, a feather boa or even some jewelry/bling. You could also make a gingerbread “boy” with a felt vest and bow tie! I’d love to see a picture of your version. 🙂

crystal-1b3-copy-flatfullwidth

Bears Can Knit, Too!

On your gift-giving list, is there a bear collector, or a knitter, or maybe someone who just loves tiny treasures?

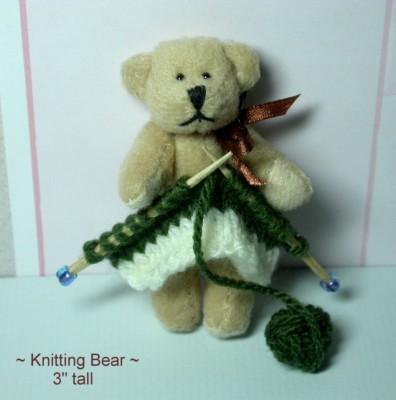
Well, this mini teddy bear might be perfect for all three! Whether he decorates a birthday package or is a “gift” all by himself, he’s pretty hard to resist!

bear1

You can finish this project quick as a wink by using a 3″
pre-made bear. The knitting is done on full size knitting needles (size 1) and then transferred to tiny “bear-sized” knitting needles – made from toothpicks!

“Knitting Bear” Tutorial:

Supplies needed:

3” Bear – from your local craft supply store (I found mine at Michael’s)
A scrap of 1/8” ribbon for a bow at teddy’s neck
Assorted remnants of sport weight yarns
Size 1 Knitting Needles
2 round wooden toothpicks
2 size-5/0 beads (or any bead that fits the toothpick)
Tacky Glue

Directions:

Tie a bow at Teddy’s neck and then set him aside.

Using size 1 knitting needles, cast on 15 stitches in your choice of color.

Knit in stockinette stitch for 3 rows, then change colors for 3 more rows. If the knitted piece seems long enough, (depending on your yarn and tension) cut the yarn – leaving a one-yard piece, which will be rolled into a little ball of yarn.

Carefully put half of the stitches on one toothpick, and then the rest of the stitches on the other – moving them slowly to avoid losing stitches in the transfer!

Once you have transferred the stitches, the toothpicks may need a little trimming if they seem too long or are too fat for the beads to slip onto easily. I trimmed mine a bit with the tip of my wire cutters. The wood is soft and trims easily.

Next, glue the beads onto the toothpick ends.
Bring the hanging piece of yarn over the needles to the front, and roll it into a ball – starting at the end of the yarn. Use a little glue here and there to hold the round shape.

Any loose strands on the back of the knitting can either be woven in, or snipped close to the work and secured with a dab of glue.

Finally, place the piece of knitting in the bear’s paws and glue it to his chest area with a generous little dollop of tacky glue. Let dry.

Finished!!! Aww . . . isn’t he sweet?

crystal-1b3-copy-flatfullwidth

Swedish Cinnamon Cookies Recipe

Monday greetings!

My sister, Nancy, has sent in another of her favorite recipes. This one is for easy-to-make cinnamon cookies.

Her photo has me wishing I had a couple of them right now – with a nice hot cup of tea . . .

cinnamon-cookies

Swedish Cinnamon Cookies

1 cup margarine or butter
1 cup sugar
1 TBSP molasses
1 tsp baking soda
1 egg yolk
2 cups flour
1 TBSP cinnamon
Sugar to coat cookies b4 baking

Cream the butter and sugar until light and fluffy.

Add the molasses and mix well.

In a small bowl, dissolve the baking soda in the egg yolk, and stir into creamed mixture.

Add the flour and cinnamon and mix well.

Roll the dough into small balls and drop (5 or 6 of them at a time) into a bowl of sugar.

Shake them around to coat and place on a cookie sheet.

Bake at 350 degrees for 12 minutes.

bakingscene1

Thanks again, Sis 🙂

crystal-1b3-copy-flatfullwidth

Valentine Hearts of Lace

It’s true that Christmas was only a few days ago but . . .

Valentine’s Day will be upon us in the blink of an eye!

So, in honor of the occasion, I thought you might like another quick and easy-to-make ornament!

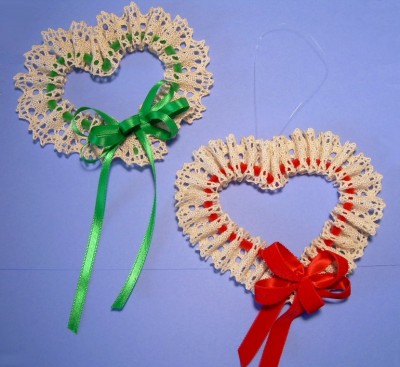
These airy little hearts only look as if they are hand crocheted! Actually, they’re a cinch to make with cotton cluny lace and chenille stems. So pretty hanging in a window, but they’re also perfect to tie on a gift!

laceheartvalentine1

Use any color scheme you like.

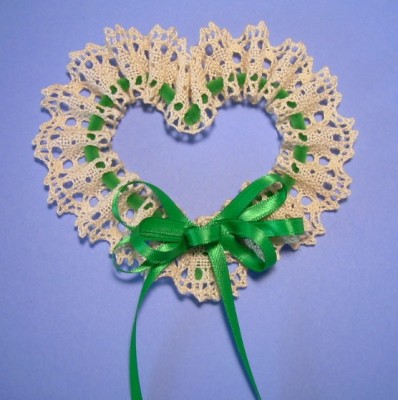
For Valentine’s Day, I love the traditional red or pink colors, but this green one makes a great Victorian-style Christmas ornament! (Burgundy or Plum would be beautiful, as well!)

lace-hearta

The secret is the cotton lace that you can find online at Home-Sew – a great source for lace, trims, ribbon, and other goodies. (The lace may also be available at a fabric store near you.)

Materials Needed:

*One 12” chenille stem (pipe cleaner)
*22” piece of 1-1/4 inch-wide cotton cluny lace
*1 yd. of 1/4″-wide satin ribbon.
*Fishing line or embroidery floss for hanger
*Tacky glue

Instructions:

NOTE: Read through all directions before beginning.

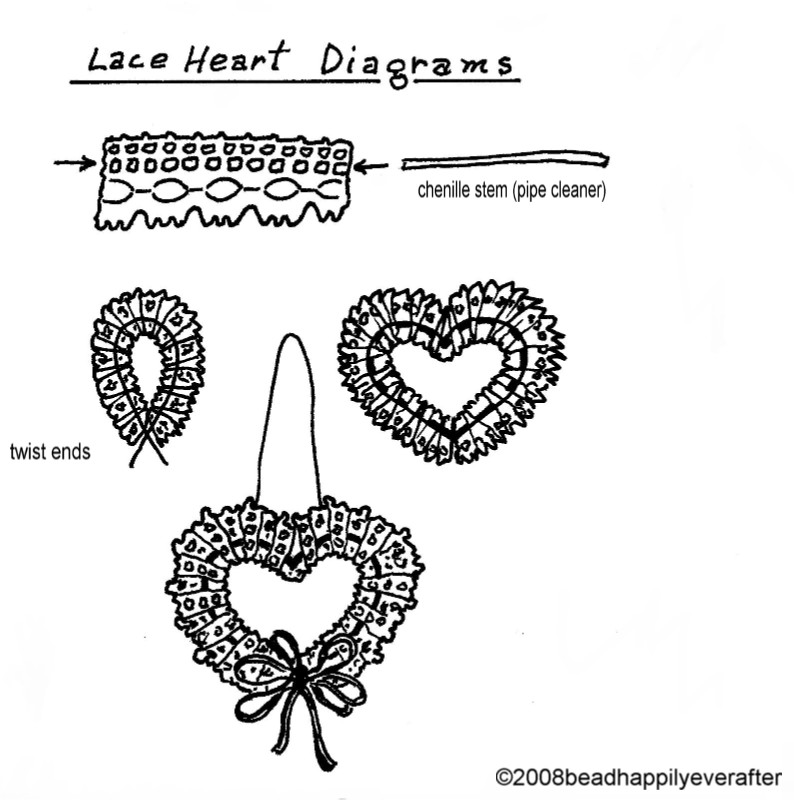
1. Thread the chenille stem through every other hole in the 2nd row of holes on the lace – see diagram.
2. Adjust the gathers evenly and bring the ends of the chenille stem together and twist 2-3 times.
3. Cut off excess chenille stem ends. The point of the twisted ends forms the point of the heart.
4. Shape the stem into a heart and adjust the gathers again if needed.
5. Make a loopy bow and glue to the bottom of the heart.
6. Attach fishing line hanger.

lace-heart2

When finished, the heart measures 5-1/2″ across.

If desired, you can make smaller hearts by using half of a chenille stem and an 11″ piece of 7/8″-wide lace.