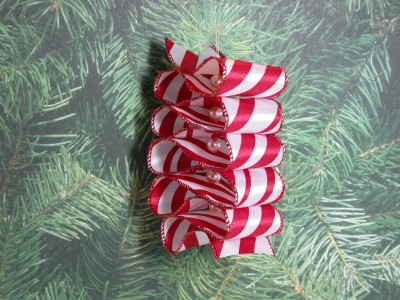
Is it Friday, already? Wow, that was fast! OK then, for this week’s Friday Favorites, we have the 4th ornament in the series: “12 Ornaments of Christmas”. 😀
As you all know, there are lots of wonderful ideas for handmade ornaments out there. Some of them are incredibly detailed and take hours to make. I love that kind, and I’ve made a bunch of beautiful but labor-intensive ornaments over the years.
Sometimes though (especially if you want to make several new ornaments this season) it’s “Cute, Quick, and Easy” that you need! My goal for this series is to give you some choices that you can squeeze into your busy schedule while you’re doing all the things you usually do!
When I was a little kid, I was fascinated with ribbon candy! It was so pretty and colorful and the peppermint flavor was my favorite. This ornament takes me right back to the time when I was a wide-eyed child, mesmerized with the colorful lights, the smells, the flavors, and the wonder of Christmas.
With a few simple steps, you can make your own “Ribbon Candy” ornament. Whether you put it on the tree or dangle a few of them in different colors, and at different lengths, from the ceiling or a light fixture, I bet you’ll receive compliments!
Ribbon Candy Ornament
Supplies for one ornament:
Wired Ribbon with Stripes, 1-1/2” wide, 1 yard
Ten Faux Pearls (8mm)
Quilting thread
Tacky gel glue or “Fray Check”
Sharp Needle that will easily pass through the hole in the pearlDirections:
Quick Note: I found it helpful to pre-shape the ribbon ahead of time in order to estimate where the soft folds would fall on the piece of candy. In that way, I had a pretty good sense of how the finished piece would shape-up before I began to actually “sew” the folds in place.
1. Using a long piece of doubled knotted thread and the photo as a guide (Click on it for a closer look.), stitch thru the center of one end of the ribbon candy and then string the first pearl. (The pearls help to keep the folds of the candy slightly separate.)
2. Next, take a stitch through the center of the first rounded loop of the candy and then thread another pearl.
3. Continue in this manner until you have 5 loops on each side and have used all ten pearls. Your thread should now be coming out of the other end of the candy. Cut away any excess ribbon at this point. This will be the top of the ornament.
4. Pull the thread with a light tension and take a couple of tiny stitches to secure, but don’t cut the thread just yet.
5. Separate the two pieces of thread and let them untwist. Once the ends have untwisted fully, tie a knot at the top – this is now your hanging loop.
6. Use a toothpick (or a pin) to apply a very thin line of glue to the very edges of the ribbon to prevent fraying.
7. Finished! Isn’t it cute?!
Maybe you’ll decide to experiment with wider or narrower ribbon, and/or substitute sparkling crystals for the pearls.
Have fun! 🙂


